Monday, September 1, 2008
Sunday, August 31, 2008
Feast Day!
Today was the feast day at our church. I will expand on this a little later.
Here is the recipe I promised to post. Pictures will be added this evening. I'm pooped.
Lemon Ricotta Cookies with Lemon Glaze
Here is the recipe I promised to post. Pictures will be added this evening. I'm pooped.
Lemon Ricotta Cookies with Lemon Glaze
Saturday, August 30, 2008
Snack Mixes
I have been experimenting with making my own snack mix (similar to Chex mix). I started out using seasoning packets from the spice aisle, adding them to melted butter and then baking. They work very well but you're never quite sure what all is in them. So I made my own this evening. Its in the oven currently but the pre-oven taste test was pretty yummy. Here's the recipe.
P.S. Ben is perfectly happy with the base ingredients on their own. We'll see what he thinks of the finished product.
P.P.S. Fruity snack mix? How would you get the flavor into the cereal???
Basic Snack Mix
Base Indredients:
4 cups corn (chex-like) cereal
1 cup cashews
1 cup almonds (I used sliced almonds. Its just what I had on hand.)
1 cup sunflower seeds
Seasoning Ingredients:
1 stick (1/2 cup) melted butter
2 tsp salt (I used kosher.)
2 tsp seasoning salt
2 tsp granulated garlic
2 Tbsp dried Parsley Flakes*
1 Tbsp dried Minced Onion
Melt the butter in a pan. Measure the base ingredients and put into a bowl. Measure the seasoning ingredients into your measuring cup. When butter is melted, turn to medium heat. Add seasoning ingredients and stir until well combined. Pour evenly over base ingredients and stir together quickly and throughly. Pour on to lined baking sheet. Bake at 300 degrees. Stir every 20 minutes for 40 minutes. Cool.
Friday, August 29, 2008
Barefoot Bloggers - Butterflied Chicken
Ina has done it again. 'What?' You may ask, 'has she done again?' Ina has combined a few simple ingredients to great a bite that says,'This is what cooking is all about!'
Lemon, garlic and rosemary - they seem ordinary enough . . . right? Maybe, but when combined they are an extraordinary team that brings out the best flavors a chicken has to offer. This trio make chicken the star of any show. They give the chicken a fresh citrus aroma with a slight hint at woodsy. This is an easy must try recipe.
Note: I didn't grill my chicken. I sauteed it in olive oil. Delicious!
Here is the recipe.
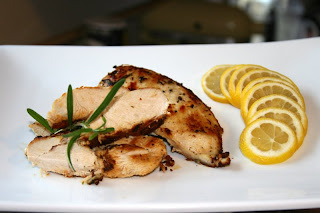

(We loved it. Need I say more?)
Monday, August 18, 2008
Cakes from the Past
To catch ya up . . . these are the cakes that I have made 'professionally' so far. Hope you like them. Let me know any comments. Thanks
This first cake is the first one I did for a friend of mine. It was her mother's birthday.

This is a Thanksgiving cake I did for my Aunt.


This first cake is the first one I did for a friend of mine. It was her mother's birthday.

This is a Thanksgiving cake I did for my Aunt.

Friday, August 15, 2008
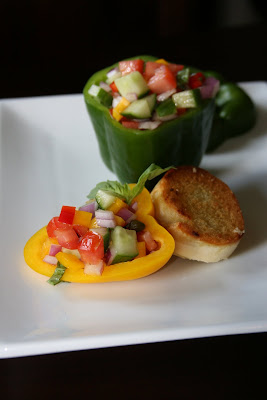
Barefoot Bloggers - My First Post - Panzanella
A Side Note: YAY!
Panzanella is a bread salad originating from Italy. Its full of bright garden yummies such as red and yellow peppers and scrumptious tomatoes, as well as, everyone's favorite - fried bread! Capers and basil run throughout the crunchy bites, as the vinaigrette excites the tongue.
This is a great salad for the lake, picnic or even just a barbecue. It doesn't have any mayonnaise so you don't have to worry about spoilage and its pretty good whether its cold or room temperature.
For presentation reasons, I cut my components smaller than Ina's recommendations.
Here's a link to the recipe.


Tuesday, April 22, 2008
Chocolate-Chip Cookies
What is more American than the chocolate-chip cookie? Apple pie, you reply. Well, maybe to some, but the history of the apple pie really goes back into the english and dutch history books. Our English settlers had to wait a while until they were sent barrels for tree starts from across the Atlantic.
The chocolate-chip cookie was created here. Chocolate chips were even born in this great land. So I ask you again . . .
Anyways.
Many of us grew up loving the Nestle Toll House recipe - the old favorite against which we judge all cookies. Everyone has a different way that they prefer their chocolate-chip cookie, too. Some like them crunchy, some cake-like, while others like their cookie chewy. There are even debates on how many chips should be involved.
Well, I sought out the perfect cookie. I like soft and chewy with a medium amount of chips. Ben likes chewy with a little crunch on the edge with the same amount of gooey chocolate.
This past Christmas, one of Ben's aunts brought a new recipe to the table. She had taken out some of the sugar ( a quarter cup, I believe) and replaced it with a small package of vanilla pudding mix. This resulted in a very soft, cake-like cookie. Unfortunately, it didn't have the same flavor that Ben and I look for and it definitely did not have the chewiness we desire.
Alton Brown has even created 3 separate recipes to soothe the different cookie yearnings. He has named them for their properties. The Thin, The Chewy and The Puffy. He also has a Gluten Free version of 'The Chewy'.
In his recipe for 'The Chewy', AB uses bread flour. Bread flour? In cookies? I am telling you guys and gals, this man is genius!
This is a delightful cookie. The texture and chewiness are wonderful . . . but . . . it was lacking the Toll House flavor that I look for.
So I went back to my Kitchen Aid . . .
Almost the Best Chocolate Chip Cookie
Wet:
1 stick or 1/2 cup margarine, softened at room temp.
1 stick or 1/2 cup butter, unsalted and also softened at room temp.
3/4 cup sugar
3/4 cup brown sugar (I use light brown.)
1 tsp. vanilla
2 large eggs
Dry:
2 cups bread flour
1 tsp salt
1 tsp baking soda
Chocolate: (the most important)
11/2 cups semi-sweet chocolate chips
The Process
In your bowl, cream the butter, margarine, sugars and vanilla. Once combined add the eggs, one at a time. I let the mixture continue to cream while I sift the dry ingredients together. (Sifting is not necessary but helps to mix the ingredients thoroughly.) Then on low speed, I slowly add the dry ingredients to the wet. I then scrape down the flat beater and remove the bowl from the mixer. I scrape down the sides and give the batter a good mix to make sure everything is properly combined. I then stir in the chips.
At this point, you have three options: a) have a couple friends over to watch chick flicks and enjoy the cookie dough, b) roll the dough into parchment paper to be chilled, or c) scoop by the teaspoonful on to a cookie sheet and toss into a 375 degree oven for 10-12 minutes. I turn my cookies at the half way mark.
Note: I have used many different chips, from off brand to gourmet, and they all result in a wonderful cookie.
Leek and Potato Soup
Before I start the recipe . . . I am sorry for not sharing my recipes lately. But I am back!
Last summer one of Ben's parents (I say it was his mom and Ben says it was his dad, who knows!) made Vichyssoise. It was delicious. Vichyssoise is a French soup that can be served at any temperature and is made with leeks and potatoes. Leeks are a relative of garlic and onions. It has a milder flavor than the onion but not as mild as a scallion. Its cooked for about an hour and a half and then blended. The only seasonings are salt and white pepper. Well, I can't do that. It's just a little bland for my American palette. So . . . . I added on! This is the recipe that I have made 3 times in the span of two weeks due to the requests of Ben. Let me know what you think.
Note: This recipe was based off Alton Brown's Leek and Potato Soup recipe found at FoodNetwork.com.
Here is a link for further reading on the leek.
Wikipedia/leeks
Leek and Potato Soup
4 Servings (Unless you are feeding a guy, then 2[with 1 refill for him and half a refill for you;)].)
3 Leeks - the bottom should be about an inch in diameter
4-6 Idaho Potatoes - small potatoes use 6, bigger - use 4 or 5
Kosher Salt
White Pepper - if you don't mind seeing your pepper, you can use black pepper. You'll get more flavor.
1 cup Heavy Cream - a.k.a. Heavy Whipping Cream, Whipping Cream
1 cup Buttermilk
1/2 cup sour cream
6 Tbsp Butter - unsalted (its less than one stick)
4 Tbsp Olive Oil
2 tsp Diced Garlic
1 Quart Vegetable Stock
Romano cheese - If you are going to use the Romano, get the real stuff. I get mine from The Fresh Market on Jefferson in Covington Plaza. I use a turning grater (like you see at Olive Garden. If you are going to buy one (they are fantastic), get the OXO one.)If you are using a box grater, use the small grates. You can use Parmesan, as well.
Chives
Parsley - Italian Flatleaf, if you please.
The Prep
Leeks -
The leeks will be long and have roots at the end. You will have paid about $2 per pound and will only use about one third of what you bought. Also, the leeks grow in sandy soil and as they push up through that soil, the sand and grit gets into the leeks. This means you need to take care when prepping leeks. First you will want to cut the root end off. I usually cut about a 1/4 of an inch above the root line. Next you will need to cut off the dark green leaves. The first two leaves will have a 'v' and that is usually where I cut.
At this point, you will want fill your clean sink pretty full with cool water. You want the leeks to float and the sand and dirt to fall to the bottom. You'll need a strainer/colander to drain the leeks after they're cleaned.
Cut the leeks into quarters, lengthwise, then cut into bite size pieces. You want the pieces to be the same size so that they cook evenly. As you cut the leeks, you can put the pieces in the sink. Make sure that you pull the layers apart and rub the leaks. This will ensure that you get all the grit out. I let my leeks sit in the water for a few minutes after I have cleaned them. This lets the water calm down and the grit and dirt will fall to the bottom. When you are ready to pull them out, a slotted spoon or your hands are the best tools. Put the leeks into the strainer and shake to remove any excess water. I use the left over water to rinse the knife and cutting board.
Potatoes -
The potatoes simply need to be peeled and diced. I wouldn't cut them smaller than a 1/2 inch dice unless you are planning on blending the soup. If you are leaving it chunky, a bigger piece of potato is better in the mouth. -Just FYI- I have not tried the soup with the potato peels on. If you are going to blend your soup, I don't think I would leave them on. I am sure they would be delicious in the chunky style though. As for any other types of potatoes, just experiment and find what you like.
Herbs-
The parsley and chives simply need to be chopped separately.
The Process
In a large pot, melt three tablespoons of the butter and add the olive oil. Once the butter is melted you can add the drained leeks. Also add kosher salt and the pepper of your choice, to your taste. You will want to sweat the leeks over medium heat for about 20 minutes, stirring occasionally. The salt will draw water out of the leeks and will allow them to soften without browning. (That is what it means to 'sweat' something.)
I usually dice the potatoes while the leeks are sweating.
After the leeks are softened, add the potatoes and the garlic. I let them cook for just a few moments and then I add the veggie stock. I cover the pot and let it cook at a low to medium boil for ten minutes. Then take the lid off, stir and let cook, uncovered, for another 10 minutes.
Once the potatoes are soft, its time to make the choice. To blend or not to blend. That is the question. Ben likes it chunky. I like both. I think that it also depends on how and who you are serving. If its a weeknight and just you and yours, serve it however. If its dinner guests, blend it.
To blend the soup, ladle small portions into the blender or food processor. Pulse until desired consistency, then return to pot.
When the soup is blended, or, if you are leaving it chunky, stir in your dairy products, including the cheese. I also add the herbs at the end. I reserve some of the herbs for garnish. The amount of herbs is up to you. Add a few and taste. I usually add 2 Tbsp of parsley and 1 Tbsp of chives. I add about one third to one half cup of cheese. This will add some saltiness to the soup, so check for seasoning before you serve.
Thursday, January 10, 2008
Frustrated
Why do cookies get hard? Why don't they stay soft? Ahhh, thank goodness for white bread and ziplocs.
Monday, January 7, 2008
Beef Stew
For me, my dad made the best Beef Stew. I think that it was my dad who gave me my love to cook and bake. He should be a chef.
Back to the stew . . .
So, our church celebrated Christmas Sunday night and we feasted afterwards. I asked Ben what he wanted to take for the feast and he said Beef Stew. Beef Stew? Um, okay?!?! I hadn't made beef stew before. I didn't know how. I thought about things I had seen on the Food Network and no, I hadn't seen beef stew. How does one make beef stew? Well, I winged it, to say the least. To my surprise, it turned out very well. ( I would say that Dad taught me well!) I even had someone ask for the recipe! Yay! So here it is:
Beef Stew
Makes: A LOT!
5 carrots
6 medium potatoes
1/2 of a small/medium onion (mine was about the size of a tennis ball)
3 1/4 lb. 'beef cuts for stew' (found at your local megamart - it's already cubed for you and says it's "for stewing")
12 oz fresh peas
a bag of frozen green beans (use fresh in season)
4 medium garlic cloves
2 quarts of beef stock (make sure its stock, not broth!)
1 small can of tomato paste
salt (We use kosher.)
pepper (Nothing beats freshly ground!)
1/4 C extra virgin olive oil
Carrots: The carrots need to be peeled and cut to about an inch in length.
Potatoes: The potatoes should be cut so that they are similar in size to the carrots. This will help every thing cook evenly.
Onion: To chop the onion you will want to thinly slice it. Then thinly dice it.
Garlic: All you need to do to the garlic cloves is smash them with the side of the knife or the bottom of a can. ;) Once they're smashed, take off the skins.
Beef: Salt and pepper your beef before you put it in the pan.
Heat your biggest pot to high and add in the olive oil. Wait until the oil is wavy, then add your smashed garlic and beef (after it's been salt and peppered of course). You will want to add it in at least 3 batches to ensure that it browns. When each batch is browned, pull it out onto a plate. The meat won't be fully cooked yet - we'll get back to in in a few minutes. (Oh, and leave the garlic in the pot.)
Now you can add your onions, carrots and potatoes. Leave them alone for a few minutes so that they can caramelize. Stir them to caramelize the other sides.
Once your veggies are browned, add your beef back in. You will also add in the whole can of tomato paste at this time. Stir in the paste and cook for about 5 minutes.
At this time salt and pepper everything and stir. Then add both containers of stock. Use your spoon to scrape the bottom of the pot and get the food off the bottom. This is called deglazing. Bring to a boil for 30 minutes. Add the peas and green beans, and boil for 10-15 minutes, or until the peas are cooked through. If you are planning on serving soon (within 20 minutes), let the stew simmer on low. To reheat for later use, place on medium for 20 minutes.
smashed garlic: The garlic will be cooked for such a long time that it will 'melt' into the stock. There is no need to cut it smaller.
browning: Browning meat intensifies its natural flavors. It is caused by the "Maillard Reaction" and is closely related to...
caramelization: Caramelization converts the sugars in a fruit or vegetable so it tastes sweet (like caramel). It also softens the fruit/veggie (so, be careful, or you'll over-caramelize it and get burned mush!)
deglazing: By the time you have stirred in the tomato paste and allowed it to cook, there will be a residue of caramelized food stuck to the bottom of your pot. By adding the stock, allowing it to boil, and scraping the bottom of the pot, you can get that residue off, thus deglazing the pan. The residue will add lots of flavor to the stew.
Back to the stew . . .
So, our church celebrated Christmas Sunday night and we feasted afterwards. I asked Ben what he wanted to take for the feast and he said Beef Stew. Beef Stew? Um, okay?!?! I hadn't made beef stew before. I didn't know how. I thought about things I had seen on the Food Network and no, I hadn't seen beef stew. How does one make beef stew? Well, I winged it, to say the least. To my surprise, it turned out very well. ( I would say that Dad taught me well!) I even had someone ask for the recipe! Yay! So here it is:
Beef Stew
Makes: A LOT!
5 carrots
6 medium potatoes
1/2 of a small/medium onion (mine was about the size of a tennis ball)
3 1/4 lb. 'beef cuts for stew' (found at your local megamart - it's already cubed for you and says it's "for stewing")
12 oz fresh peas
a bag of frozen green beans (use fresh in season)
4 medium garlic cloves
2 quarts of beef stock (make sure its stock, not broth!)
1 small can of tomato paste
salt (We use kosher.)
pepper (Nothing beats freshly ground!)
1/4 C extra virgin olive oil
Prep Work
Carrots: The carrots need to be peeled and cut to about an inch in length.
Potatoes: The potatoes should be cut so that they are similar in size to the carrots. This will help every thing cook evenly.
Onion: To chop the onion you will want to thinly slice it. Then thinly dice it.
Garlic: All you need to do to the garlic cloves is smash them with the side of the knife or the bottom of a can. ;) Once they're smashed, take off the skins.
Beef: Salt and pepper your beef before you put it in the pan.
The Process
Heat your biggest pot to high and add in the olive oil. Wait until the oil is wavy, then add your smashed garlic and beef (after it's been salt and peppered of course). You will want to add it in at least 3 batches to ensure that it browns. When each batch is browned, pull it out onto a plate. The meat won't be fully cooked yet - we'll get back to in in a few minutes. (Oh, and leave the garlic in the pot.)
Now you can add your onions, carrots and potatoes. Leave them alone for a few minutes so that they can caramelize. Stir them to caramelize the other sides.
Once your veggies are browned, add your beef back in. You will also add in the whole can of tomato paste at this time. Stir in the paste and cook for about 5 minutes.
At this time salt and pepper everything and stir. Then add both containers of stock. Use your spoon to scrape the bottom of the pot and get the food off the bottom. This is called deglazing. Bring to a boil for 30 minutes. Add the peas and green beans, and boil for 10-15 minutes, or until the peas are cooked through. If you are planning on serving soon (within 20 minutes), let the stew simmer on low. To reheat for later use, place on medium for 20 minutes.
Bolded Terms:
smashed garlic: The garlic will be cooked for such a long time that it will 'melt' into the stock. There is no need to cut it smaller.
browning: Browning meat intensifies its natural flavors. It is caused by the "Maillard Reaction" and is closely related to...
caramelization: Caramelization converts the sugars in a fruit or vegetable so it tastes sweet (like caramel). It also softens the fruit/veggie (so, be careful, or you'll over-caramelize it and get burned mush!)
deglazing: By the time you have stirred in the tomato paste and allowed it to cook, there will be a residue of caramelized food stuck to the bottom of your pot. By adding the stock, allowing it to boil, and scraping the bottom of the pot, you can get that residue off, thus deglazing the pan. The residue will add lots of flavor to the stew.
Sunday, January 6, 2008
Bread
I love to bake bread. So, a while ago, I started baking bread for our church. It's used for the Eucharist (aka Communion). I pretty proud of it, even though I shouldn't be, but everyone likes it. So tonight I am working on two batches for Sunday. We are going to celebrate our Liturgy in the morning and on Sunday evening (aka Monday morning) we'll celebrate our Christmas Liturgy. Our Liturgical calendar is based on the "Old Calendar" (Julian) which falls 13 days behind the "New Calendar" (Gregorian).
Back to the Bread . . . Most bread recipes include sugar (for the yeast to eat), oil (I'm not sure why), and some have warmed milk (another one I'm not sure of). In our traditions, the bread that will become the Host should be as pure and simple as possible. This means that it can only contain flour, salt, yeast and water. This was kind of difficult at first. Most of the proper church recipes are dry or hard or really flat tasting. So, this was officially the first recipe I have ever created. It's definitely not fool-proof though. I am pretty much the only one who can use this recipe. (That's not a good thing.) It's not that the recipe is fussy it's just getting the right balance which changes with the weather. I guess it's a learned technique. Ben and I watch a lot of Alton Brown on "Good Eats."
Well, here's the recipe and technique. Let me know what you think.
3 1/4 C Bread Flour (keep extra around)
2 teas. instant yeast
1 teas. Kosher Salt
2 cups hot water
1) Prepare the Yeast
To prepare the yeast, you need to bloom* it in hot water. I use hot tap water. It's not quite as hot as my faucet will go but just about. I put about 1/4 C in a small bowl or cup along with the yeast. Set the rest of the water aside. I let this set about 10 minutes. (A note: Usually, the hotter the water, the quicker the bread will rise. However, if the water is too hot, it will kill the yeast.)
2) Prepare the Flour
I use a Kitchen Aid, with the hook attachment, to mix my bread. So, in the mixer bowl, add the flour and the salt. Mix this for just a moment.
3) The Bread
When the yeast has bloomed*, add the yeast-water to the flour-salt mixture while the mixer is on low speed. If there is still yeast in the 'cup', use some of the extra water to 'rinse' out the cup into the mixer(which is still going at this point). You will want to watch your bread as it comes together. Stream in the extra water until the bread flour has all been combined into the dough. You will want to err on the side of slightly too much water. You can now use extra flour, added slowly, to 'soak up' some of the water. You will want to keep your dough in the mixer to knead it. (This method takes less human muscle. ;) ) You can add small amounts of flour to make sure the dough does not stick to the bowl, especially at the bottom of the bowl. You will know if you have added to much flour because the ball of dough will have a 'foot' slapping around in the bowl. I usually knead the dough in the mixer for about 10 minutes. I then take it out and knead for a few moments. For church, I split the dough into five rounds and then put them into individual sandwich zip-top baggies. If you aren't using the bread for religious purposes, then I would split the dough in two and put each half into individual gallon size bags. Make sure, when sealing the zip-top baggies, to leave plenty of air in them. This will give the bread more room to rise. (A note: I like to let my bread rise while I am running my portable dishwasher. The top of the dishwasher is the perfect warm spot for bread rising.)
4) The second Knead
After about an hour or after the dough has at least doubled in size, I knead the dough for a second time. I only knead it for about 5 min or so per loaf. I like to make sure the loafs are semi-round. For loaf pans, make your dough cylindrical. Then place the bread on a parchment paper lined cookie sheet or in your loaf pans. If you choose to use loaf pans, I would line them with a piece of parchment on at least 3 long sides(2 sides and a bottom). Let these loaves rise for about 10 minutes.
5) Stamping
If using this recipe for religious purposes, you will want to stamp the bread shortly before it goes into the oven. I usually hold my floured, plastic stamp down for about 20 seconds.
6) Bake
Bake your bread at 375 degrees for about 30 minutes. You will want to start checking after 25 minutes. I don't think that it will need more that 40 minutes. To test the doneness, tap the top of each loaf with your fingers or the back of a spoon. The loaves should sound hollow.
7) Cooling
It's important to let your bread cool fully before consuming. Do not pack it up until it has cooled, as well.
Well, there it is. If you try it out, let me know. Please feel free to contact me if you have any questions.
Thanks for reading.
Saturday, January 5, 2008
s l i c e
Hey. I just want to write about food. I want to explore food and create new recipes. I hope to open a bakery . . . someday. Know something I don't? Tell. Teach. Comment. Call. I want to learn all that I can and share it with you along the way.
Also, do you want to know about a particular food? What it tastes like, where/how its grown, how to prepare it? Let me know and I will find out for you.
Thanks for reading!
Also, do you want to know about a particular food? What it tastes like, where/how its grown, how to prepare it? Let me know and I will find out for you.
Thanks for reading!
Subscribe to:
Posts (Atom)